Today i m releasing Asino footer for blogger or you can say Thesis style footer for blogger. Actually its not Thesis style its called Asino. Well no problem at last we can now have for blogger also, thanks to ramandeep who inspired me or you can say gave idea to make it for blogger. At last its here for Blogger.

Category: Blogger Tutorials
How to add Adsense In between Posts
This Post has been Requested by Glue on Guerilla v2.2 – Blogger Template . As All of the bloggers also know that one of the most biggest earning thing in blogger is Google’s Adsense. From were Most of the bloggers earn revenue and run their blogs cost of server or of hosting or domain or for their pocket money. But the most targeted area is the post section but how to add the Ads in Post.
So lets Get Started :
- Login to your blogger dashboard
- Then Click on Edit HTML
- Tick the Expand widget Template
- Find for <data:post.body/>
- If your template is with Automatic Read More Hack with fixed pages Then Find for this code :
<b:if cond=’data:blog.pageType == "static_page"’><b:else/>
- Add your Adsense code before the above code.
- If you Want to display the Ads only on the Post Page then with the Reference to : “How to Show sidebar or widgets only on Home page or Post page“
<b:if cond=’data:blog.pageType == “item”‘>
You Adsense Code your
</b:if>
I think this Must be Enough for now.
How to Add Breadcrumb for blogger blog
All of us might have seen breadcrumbs on most wordpress blog.
So why not implement a breadcrumb for the blogger blogs.. For those who don’t know what a breadcrumb is,here is a little defenition from wikipedia.
Breadcrumbs or breadcrumb trail is a navigation aid used in user interfaces. It gives users a way to keep track of their location within programs or documents. The term comes from the trail of breadcrumbs left by Hansel and Gretel in the popular fairytale.
The trails like Home >> Label >> Post Name are the breadcrumbs.
So Now lets get Started :
- Login to your blogger dashboard
- Go to Layouts and then Edit HTML
- Then I would Sugguest you download the whole template first then Continue Editing.
- Then Tick the Expand widget Template.
- Now find for this Code :
<b:include data='top' name='status-message'/> - Now Find :
<b:includable id='main' var='top'> - Now Replace the above code with below code :
<b:includable id='breadcrumb' var='posts'> <b:if cond='data:blog.homepageUrl == data:blog.url'> <!-- No breadcrumb on home page --> <b:else/> <b:if cond='data:blog.pageType == "item"'> <!-- breadcrumb for the post page --> <p class='breadcrumbs'> <span class='post-labels'> <a expr:href='data:blog.homepageUrl' rel='tag'>Home</a> <b:loop values='data:posts' var='post'> <b:if cond='data:post.labels'> <b:loop values='data:post.labels' var='label'> <b:if cond='data:label.isLast == "true"'> » <a expr:href='data:label.url' rel='tag'><data:label.name/></a> </b:if> </b:loop> <b:else/> »Unlabelled </b:if> » <span><data:post.title/></span> </b:loop> </span> </p> <b:else/> <b:if cond='data:blog.pageType == "archive"'> <!-- breadcrumb for the label archive page and search pages.. --> <p class='breadcrumbs'> <span class='post-labels'> <a expr:href='data:blog.homepageUrl'>Home</a> » Archives for <data:blog.pageName/> </span> </p> <b:else/> <b:if cond='data:blog.pageType == "index"'> <p class='breadcrumbs'> <span class='post-labels'> <b:if cond='data:blog.pageName == ""'> <a expr:href='data:blog.homepageUrl'>Home</a> » All posts <b:else/> <a expr:href='data:blog.homepageUrl'>Home</a> » Posts filed under <data:blog.pageName/> </b:if> </span> </p> </b:if> </b:if> </b:if> </b:if> </b:includable> <b:includable id='main' var='top'>
- Now Find ]]></b:skin> and replace it with the below code :
.breadcrumbs { padding:5px 5px 5px 0px; margin: 0px 0px 15px 0px; font-size:95%; line-height: 1.4em; border-bottom:3px double #e6e4e3; } ]]></b:skin>
Now Replace it with the below code :
<b:include data='top' name='status-message'/> <b:include data='posts' name='breadcrumb'/> |
Now you should have a working breadcrumb navigation on your system.
How to Upload Images by URL in Blogger
Blogger Is getting better and better day by day. Improvement in its Editor and its new improved templates. But all this things are not enough but blogger lacked in one thing that is it doesn’t provide support to upload images by URL (Link).
Why Upload Images to Blogger ?
Blogger Gives it users everything free of cost from hosting of the images to the sub-domain.Hosting Images on blogger users tension of getting images deleted or of bandwidth. And Images loads more quickly then any other host or services that provide hosting of images .
You all now maybe thinking how to upload images by URL (Link).
As their is no option like that in blogger to host images by URL (Link). Then how you host images in blogger. don’t worry Ritesh Sanap is their for you always with best2know. So I have a trick through which you can upload images to Blogger.
So Lets Get Started :
- Log in to your Blogger Dashboard.
- Then Click On New Post.
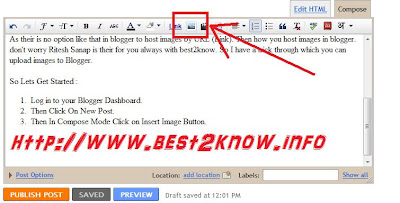
- Then In Compose Mode Click on Insert Image Button.
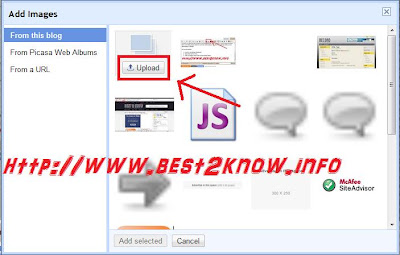
- A dialog box will get open
- Then Click on Upload Button
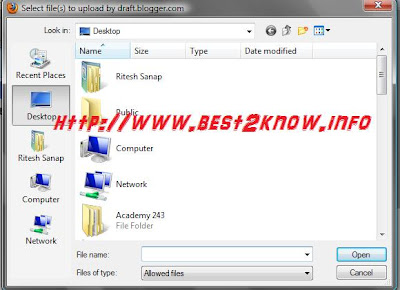
- Then Another Dialog Box will pop up
- In that Dialog Box add the Link of your image that you want to upload to Blogger.
- Then Click On Open. Image will get Uploaded and you are done.
If you like this then I think you might also like the previous post How to Host Javascript on Blogger.
If you Like This post then Please share it with your Friends and Do Comment.
Change Blog’s Font Type with Cufón

Still at the font embedding series, this time I’ll share how to change blog’s font type with Cufón. Few days ago, I write about how to change blogs font using some services. Also I’ve write about one of them, sIFR, which we know it use Flash. Cufón is different, it use javascript to render the font type.
Step 1 – Download Cufón
Download the Cufón javascript file. You can download the compressed version or uncompressed version. But I suggest you to use the compressed version.
Step 2 – Generate Font
Generate your font on its official site. The name of the resulting file will include the name of the font and the weight of the font (as a number – 400 is equivalent to “normal” and 600 means “bold”). The name of the file doesn’t actually matter at all, but it makes it easier for you to identify your fonts.
Step 3 – Integrate on the Blog
This is the step where you must add the javascript code to your blog. This code placed before </head>
<script src=”cufon-yui.js” type=”text/javascript”></script>
<script src=”Vegur_300.font.js” type=”text/javascript”></script>
<script type=”text/javascript”>
Cufon.replace(‘h1’);
</script>
Code above is just example and it use one type of font.
Step 4 – Make IE Work
Unfortunately one problem remains with Internet Explorer. In most cases, there is a short but visible delay before the text is replaced. You can avoid this issue by inserting the following code right before the closing </body> tag (or before any external scripts such as Google Analytics).
<script type=”text/javascript”> Cufon.now(); </script>
Its Done!!! Save your template and preview.
Also see
How to add Custom Favicon to blogger blog
 Hello to all my visitors . Today morning I saw a comment on trily – blogger template.That my visitor cryptoGATO wanted to add this own favicon instead of default blogger favicon. so this is my todays topic so i m going to tell to you all how to do it. I think you might have seen my favicon Generator that i have made for you all.
So now lets get started :
- Login to your blogger dashboard
- Click on Design
- Click on Edit HTML
- Find this <b:skin><![CDATA[
- Then add the below code above the <b:skin><![CDATA[ :
<link href='YOUR Image Link' rel='shortcut icon' type='image/vnd.microsoft.icon'/> - Replace Your Image Link with the link of your desired favicon.
- Then Click the preview button. If you can see the favicon on the address on the tab then you have successfully installed favicon.
- Then Click on Save.
How to remove the Blogger Nav bar
Blogger comes with a default navigation bar.This blogger navigaton bar may not be present in most of the templates.But if you are using a default blogger template,then you will see some navigation bars like the one in this picture.These navigation bars can be removed using some simple CSS techniques.
Here are the steps to remove the Blogger Navigation bar /Blogger Nav Bar :
- Login to your blogger account
- From your Dashboard click on Design
- Now choose Edit Html
- In that template code find ]]></b:skin>
- Add the below code Just before ]]></b:skin>
#navbar-iframe {display:none !important;}
- Then Click on Preview and if everything is right hit the Save button
Using sIFR 2.0 in Blogger Templates
sIFR is one of the alternative way to change font type to beautify typography, especially in the heading (H1, H2, etc.), like Cufón. This time I’ll share how to use sIFR 2.0 in blogger templates.
The Steps
- Download sIFR 2.0
- Upload the javascript files from the downloaded zip file, those are sifr-addons.js and sifr.js.
If you busy to upload those files, copy below code and paste before </head><script src=’http://mbahrizh.googlecode.com/files/sifr.js’ type=’text/javascript’></script>
<script src=’http://mbahrizh.googlecode.com/files/sifr-addons.js’ type=’text/javascript’></script> - Put the CSS code from the zip file, those are sIFR-screen.css and sIFR-print.css. If you busy to do that, copy below code and paste before </head>
I’ve compress these codes.<style media=’print’ type=’text/css’>
/* This is the print stylesheet to hide the Flash headlines from the browser… regular browser text headlines will now print as normal */
.sIFR-flash, .sIFR-flash object, .sIFR-flash embed{display:none !important; height:0; width:0; position:absolute; overflow:hidden}
span.sIFR-alternate{visibility:visible !important; display:block !important; position:static !important; left:auto !important; top:auto !important}</style><style media=’screen’ type=’text/css’>
/* These are standard sIFR styles… do not modify */
.sIFR-flash{visibility:visible !important; margin:0}
.sIFR-replaced{visibility:visible !important}
span.sIFR-alternate{position:absolute; left:0; top:0; width:0; height:0; display:block; overflow:hidden}/* Hide Adblock Object tab:the text should show up just fine, not poorly with a tab laid over it. */
.sIFR-flash+div[adblocktab=true]{display:none !important}/* These “decoy”styles are used to hide the browser text before it is replaced… the negative-letter spacing in this case is used to make the browser text metrics match up with the sIFR text metrics since the sIFR text in this example is so much narrower… your own settings may vary… any weird sizing issues you may run into are usually fixed by tweaking these decoy styles */
.sIFR-hasFlash h1{visibility:hidden; font-size:16px; letter-spacing:40px}
.sIFR-hasFlash h2{visibility:hidden; letter-spacing:-9px; font-size:14px}
.sIFR-hasFlash h3{visibility:hidden; letter-spacing:-6px; font-size:20px}
.sIFR-hasFlash h4{visibility:hidden; letter-spacing:-5px; font-size:21px}
.sIFR-hasFlash h5{letter-spacing:-4px; visibility:hidden; font-size:14px}
.sIFR-hasFlash h6{letter-spacing:-4px; visibility:hidden; font-size:12px}
</style> - This is the most importance to use your desire font type.
Actually when we download sIFR 2.0, it already bundled with flash file to make a font, but there is easier way:- Choose your desired font and save in desktop (because if it still in WINDOWS/font, it can be uploaded)
- Generate your chose font to be a swf file at sIFR Generator. Upload your font, then next and next until finish and download it. In step 2, choose sIFR version 2 because we use this version.
- Upload the downloaded file to image shack, because image shack can store swf file. After uploaded, take the link, e.g. .
- Then the last, put javascript below to activate your chose font. Change the URL to your uploaded font link.
<script type=’text/javascript’>
//<![CDATA[
/* Replacement calls. Please see documentation for more information. */if(typeof sIFR == “function”){
// This is the preferred “named argument” syntax
sIFR.replaceElement(named({sSelector:”h1″, sFlashSrc:”http://img291.imageshack.us/img291/2028/hotelcoralessexregular.swf“, sColor:”#AD3C00”, sWmode:’transparent’}));
sIFR.replaceElement(named({sSelector:”h2, h4, h6″, sFlashSrc:”http://img199.imageshack.us/img199/2368/motorway.swf“, sColor:”#2F1F00”, sWmode:’transparent’}));
sIFR.replaceElement(named({sSelector:”h5″, sFlashSrc:”http://img508.imageshack.us/img508/6843/jamesfajardo.swf“, sWmode:’transparent’}));
};
//]]>
</script>You must change the red code to your uploaded font URL.
- it’s done! You can edit above code to adjust with your template character, either font size or color.
Note:
The weakness of this sIFR 2.0 is the link text become inactive. So, don’t use heading tag (H1, H2, etc.) for text link.


