Best 2 Know

The Ultimate Blogging Resource

  • Advertising
  • WebHosting
  • Contact Us
  • Blogger
    • Blogger Templates
    • Blogger Tutorials
  • Browser
    • Firefox
    • Google Chrome
  • Google
  • Internet
    • Facebook
    • Twitter
  • Thesis
  • Windows
  • WordPress
    • WordPress Themes
    • WordPress Plugins
  • More
    • Linux
    • Review
    • Solutions
    • Announcements

Author: Ritesh Sanap

Jquery – Create Float Menu with Scroll Follow Effect

Hi! My name is Rizqy and I’m new as writer in this blog. Thanks to Ritesh for make me a writer. In this blog, I’ll write about javascript especially jquery, tips-trick windows, and maybe the other. In this occasion I’ll write about jquery javascript framework. Jquery is one of the most popular javascript framework. It has many plugin that we can use freely to beautify our blog or website.

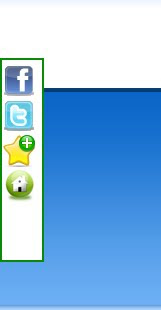
Now I’ll share how to make a float menu with touching of jquery effect. The example of float menu we can see at http://spenasa-blogger.blogspot.com. Look at the left side, you will find a float menu with some menu of course. If we scroll the page, that menu will look like follow our scroll. We will use Jquery Scrool Follow plugin for this. You can go to the documentation page of this plugin at http://kitchen.net-perspective.com/open-source/scroll-follow.

Javascript

To use the plugins from Jquery, we must add the library script from jquery. Find </head> and paste the script below.

<script src=’http://ajax.googleapis.com/ajax/libs/jquery/1.3.2/jquery.min.js’ type=’text/javascript’/>

After that, add the script below. This script is the core of the jquery scroll follow and Jquery UI.

<script src=’http://mbahrizh.googlecode.com/files/jquery.scrollfollow.js’ type=’text/javascript’/>

<script src=’http://mbahrizh.googlecode.com/files/jquery-ui-1.7.2.custom.min.js’ type=’text/javascript’/>

Also add this script. This script for call the scroll follow effect.

<script type=’text/javascript’>
$( document ).ready( function ()
{
$( ‘#floatmenu’ ).scrollFollow();
}
);
</script>

CSS

This is the basic CSS. You can costumize it as your desire. Add the CSS below before ]]></b:skin>.

#floatmenu {background:#FFF; border: 2px solid #088A08; position: absolute; width: 40px; height: 200px; color: rgb(102, 102, 102); font-size: 12px; top: 100px; left: 0px; z-index: 1;}

HTML

Basicly, you just add a <div> tag after <body> tag. You’re free to choose your menu content. You can give your facebook, twitter, or the other.

<div id=’floatmenu’>
<!– The menu content is here… –>
</div>
That’s all my first post. In another time, I’ll write about the other jquery effects. I hope you enjoy it.

April 19, 2010 Ritesh Sanap Blogger Tutorials Blogger Hacks, Jquery, Social Bookmarking

How to Show offline in Gtalk or How to be invisible in Gtalk

After my last post on GTalk (Google Talk) About the Shorcuts in Gtalk. After that day i started looking for a new stuff in Gtalk that how to show invisible or offline in Gtalk . Because it is very helpful when a person is very busy on the internet. But to be invisible is easy if you are using the chat function that is in Gmail.

Being Invisible through Gmail Chat :

  1. Login to your Gmail Account.
  2. Then go to the chat and click the down arrow beside the status bar.
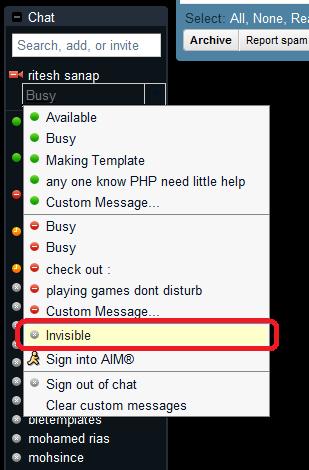
  3. then go a bit down and you will see an word Invisible click on it.
    Preview :

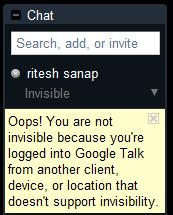
Note : If you are logged in with Gtalk That time it will show this error.

Then for this you have to sign out from Gtalk and have to chat from Gmail Chat.

If you not like to chat from Gmail chat. then I have another Edition of Gtalk which you can use.

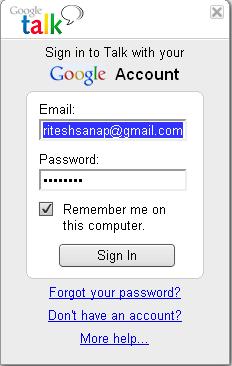
Gtalk Labs Edition : this Edition of Gtalk has option of Invisible so you can use it . has an very good looking interface and has every good notification.
preview :

Google Talk Labs Edition is being Discontinued by Google

Well Now you can Invisible using Chat for Google Chrome Extension for that read : Google Talk for Chrome – Chat for Google

April 19, 2010 Ritesh Sanap Google, Internet, Solutions Cool things, Google Talk, Gtalk

How to show 10 posts instead of 5 posts in blogger

We all always tried to show more recent Posts but we always failed because bloggers Feed Widget it only shows 5 posts only but today I m going to tell you how to show 10 recent posts or more in stead of  5 on blogger . for this you just have add a simple JavaScript. So now lets get Started.

Follow the Following steps:
1. Login in to your blogger dashboard .
2. Click on the layout Link.
3. Click on Add a Gadget Link.
4. Then Select HTML/JavaScript Add .
5. Paste the Following code and your Done.

<script src=’http://best2know.googlecode.com/files/Recent%2010%20Post%20instead%20of%205.js’ type=’text/javascript’ />
<script>
var numposts = 10;
var showpostdate = false;
var showpostsummary = false;
var numchars = 100;
</script>

<script src=”http://YOURBLOG.blogspot.com/feeds/posts/default?orderby=published&alt=json-in-script&callback=rp”></script>

<br />
<div class=”clear”></div><p style=”text-align:center;”><a href=”http://www.best2know.info/2010/04/how-to-show-10-posts-instead-of-5-posts.html” title=”Grab this wiget” target=’_blank’><b>Grab this Widget</b></a></p>

In the Above code change the YourBlog.blogspot.com with your link of your site or of your custom domain.

And if you want to show more than 10 posts then change the number which is highlighted in red color to the number of how much posts you want to show

April 16, 2010 Ritesh Sanap Uncategorized Blogger Hacks

Make a Navigation Bar with Automatic Highlighted Current Links

Today we’re going to learn how to make a navigation bar for your blog using a very simple way to highlight current links automatically. This method is very easy and it uses only conditional tags from Blogger, so there is no need for JavaScript.

I will explain here the method and how to make a simple style for your navigation bar, I mean very simple. It’s up to you the way you want to style them, I will not go trough the basics of CSS, but if you follow this tutorial carefully you will get the idea and be able to do it in any blog.

What we are making

Check here the Live Demo of the result we are going to achieve, this is a very simple example using Blogger Minima Template, just so you understand the method.

Step 1 – Preparation

As I said, I am not going trough CSS basics and all that, What we are going to explain here is the method to get the result needed, if you understand it, you will be able to make on any blog.
We are going to apply the method on a general blog using Minima template, so quickly go to your Dashboard, create a new blog, choose Minima Template and Make 2 posts Called “About” and “Contact” with some Lorem Ipsum inside. You should get something similar to the live demo.

Step 2 – Tweaking The Cross Column Section

This step is not very important to the method, but as we are going to add the widget on our Crosscol section, we are going to tweak it so it becomes available to receive widgets.
Go to your Blog’s Dashboard > Layout > Edit HTML > Hit CTRL + F > Find class=’crosscol’, and you should get this:

<div id='crosscol-wrapper' style='text-align:center'>
        <b:section class='crosscol' id='crosscol' showaddelement='no'/>
      div>

As you can notice you have these two parts on your code: style=’text-align:center’ and showaddelement=’no’, the first one make our widgets align in the center, and the second make unavailable to add any widget on your Page Elements section. So to fix it we are going to replace the whole block of code for this one:

<div id='crosscol-wrapper'>
  <b:section class='crosscol' id='crosscol' showaddelement='yes'/>
div>

Step 3 – Adding the Link List Widget

Now that we have tweaked the cross column section, we should be able to add a new widget to it, for this go to your Page Elements section, click to Add a Gadget in the section below your header.
Choose Link List from the panel, now add your links here, as you can see on the picture above, on New Site URL insert the link to your post, in the example I have used the link to my About post, and in New Site Name, the text you want on your menu. Just click Add Link to confirm. You can add as many links as wished.

Step 4 – Giving basic styles to the menu

As I said I will not go trough the basics of CSS here, so go to Layout > Edit HTML, and add the code below right before ]]>.

/* Navigation
------------------------------------------------ */
.crosscol .LinkList ul {padding:0px;}

.crosscol .LinkList ul li {
float:left;
list-style-type:none;
margin-right:1px;
}

.crosscol .LinkList ul li a {
border:1px solid #CCCCCC;
padding:5px 10px;
}

.crosscol .LinkList ul li a:hover, .crosscol .LinkList ul li a.current {
background:#ccc;
}

Basically it will make your links align horizontally, give a nice gray border to them, and make the hover and current links have a gray background.

Step 5 – Tweaking the Link List widget

Now we need to make the Link List widget behave automatically on highlighting current links, to do this go to Layout > Edit HTML > Check Expand Widget Templates and search for the following code:

<div id='crosscol-wrapper'>
        <b:section class='crosscol' id='crosscol' showaddelement='yes'>
<b:widget id='LinkList1' locked='false' title='' type='LinkList'>
<b:includable id='main'>

<b:if cond='data:title'><h2><data:title/></h2></b:if>
 <div class='widget-content'>
   <ul>
     <b:loop values='data:links' var='link'>
       <li><a expr:href='data:link.target'><data:link.name/></a></li>
     </b:loop>
   </ul>
   <b:include name='quickedit'/>
 </div>
</b:includable>
</b:widget>
</b:section>
      </div>

and replace for the following:

<div id='crosscol-wrapper'>
        <b:section class='crosscol' id='crosscol' showaddelement='yes'>
<b:widget id='LinkList1' locked='false' title='' type='LinkList'>
<b:includable id='main'>
<b:if cond='data:title'><h2><data:title/></h2></b:if>
 <div class='widget-content'>
   <ul>
     <b:loop values='data:links' var='link'>
       <b:if cond='data:blog.url!=data:link.target'>
       <li><a expr:href='data:link.target'><data:link.name/></a></li>
       <b:else/>
       <li><a class='current' expr:href='data:link.target'><data:link.name/></a></li>
       </b:if>
     </b:loop>
   </ul>
   <b:include name='quickedit'/>
 </div>
</b:includable>
</b:widget>
</b:section>
      </div>

Save it, and you are done.

Source : Blogger TuT

April 2, 2010 Ritesh Sanap Blogger Tutorials

How to Request for Invitation to New Adsense Beta Interface

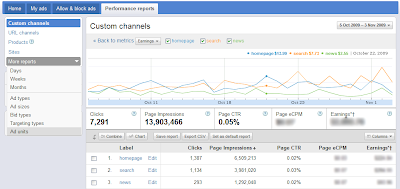
How to Request for Invitation to New Adsense Beta InterfaceAs we know that last year in the November 2009, Google Adsense has launched a new interface , but it’s still under the beta testing.As per official adsense blog , the new interface offers more detailed reports with graphs, the ability to complete common actions in bulk, and more accessible tips and help.If you are a Google Adsense Publisher and you want to try the new beta interface then you need a invitation for it.

The new interface will come with features including :

  • More detailed performance reports
  • View daily stats as graphs
  • New metrics including amount you’ve earned from various ad, targeting and bid types
  • Enhanced Ad Review Center
  • Streamlining common tasks.

To request an invitation , Just fill out the simple form and enter your name, contact email and publisher ID, then submit the form.
Click Here To Fill the Form

Screen shot:

March 26, 2010 Ritesh Sanap Google Adsense

WordPress to Blogger

As i earlier mentioned i will make and you your favorite WordPress theme to Blogger for only $10 as I am gonna convert wordpress template to blogger for $10 and i will make it easy to use for beginners so do comment to convert the wordpress template to Blogger.
Please comment with The format given below :

Theme title:
Author:
Download link:
Demo link:
Email:

March 20, 2010 Ritesh Sanap Announcements

GTalk Tips and Tricks / Shortcuts

I think many of the user an visitor of my site might be knowing the google messenger which is called  GTalk (Google Talk) officially released by google . it good simple and lighter it is just about 1 or 2 MB but it is great i too use it and it is too simple to use but today i will make it more simple to you to use by giving some shortcuts.

Dont have GTalk Click Here to Download.

Here are some Keyboard Shorcuts :


CTRL + Mousewheel up/down: Change the font size in a conversation window.
CTRL + E: Center text
CTRL + R: Right justify text
CTRL + L or CTRL+J: Left justify text
F9: Open Gmail to send an email to the person you talk to
F11: Start a call
F12: Stop the current call
ESC: Close the current window
Tab – Switches to next opened gtalk window. (same effect with Ctrl+tab and Shift+tab)
Shift + Tab – The same thing does that Tab but in reverse.
Ctrl + Shift + L – Switch between points, numbers, letters, capital letters, roman numbers and capital roman numbers

Bold Text : Use asterix before and after the text to make it bold. Like *hello* will make it hello.

Italic Text
: Use underscores before and after the text to make it italic. Like _hello_ will make it hello.

Want to leave blank message
: Just Press Shift + Enter together and meassage box will become big then leave shift and Just press Enter and the blank message will be received by your friend.

August 25, 2009 Ritesh Sanap Google, Internet, Solutions, Windows Cool things, Gtalk, Hacks

Windows Vista CD key

Windows Vista CD key

Hi again I m gonna give you something which is only for windows vista users many of you don’t like to buy an original copy windows then this is the best way to get you activated your windows but I want to tell every user that don’t support piracy instead of that buy that product because the product bought pirated are some time fake and sometime they don’t work . I too love games so buy them original . this is my opinion that you don’t support piracy but as you are in difficulty I m always to support you so today I m going to release some of the vista keys that I have received when I bought and some are given by friends so I would like if you thank them too.

Here are the Keys:

S/N: 11897-OEM-0021902-19210

S/N: YFKBB-PQJJV-G996G-VWGXY-2V3X8

S/N: VMCB9-FDRV6-6CDQM-RV23K-RP8F7 

S/N: 8rs83438dg8a83vcshsj

S/N: YFKBB-PQJJV-G996G-VWGXY-2V3X8

S/N: 7W3KH-TG8DP-W78W8-KMV8C-DV9J7

S/N: YFKBB-PQJJV-G996G-VWGXY-2V3X8

S/N: yfkbbpqjjvvwgxy2v3x8

S/N: VMCB9-FDRV6-6CDQM-RV23K-RP8F7

S/N: V4TYH-74MWQ-6VTBQ-XRD3V-9MMX2

S/N: YFKBB-PQJJV-G996G-VWGXY-2V3X8

S/N: VMCB9-FDRV6-6CDQM-RV23K-RP8F7

S/N: 8rs83438dg8a83vcshsj

S/N: YFKBB-PQJJV-G996G-VWGXY-2V3X8

S/N: 7W3KH-TG8DP-W78W8-KMV8C-DV9J7

S/N: YFKBB-PQJJV-G996G-VWGXY-2V3X8

S/N: yfkbbpqjjvvwgxy2v3x8

S/N: YFKBB-PQJJV-G996G-VWGXY-2V3X8 This serial will work with any version of Windows Vista released before 9/1 07. Work with Beta, RC 1, 2 and RTM, Final

S/N: TCP8W-T8PQJ-WWRRH-QH76C-99FBW S/N: PVYFQ-2JTBV-9KXQ2-FQHDY-MTBVH

S/N: 722X2-M2J8D-29KX4-RXFFQ-QWHFD Business version-English Upgrade only

S/N: 8rs83438dg8a83vcshsj

S/N: 9bbvt-rr6m6-mrxd3-4j97f-rcgfq

S/N: 7W3KH-TG8DP-W78W8-KMV8C-DV9J7

S/N: YFKBB-PQJJV-G996G-VWGXY-2V3X8

S/N: yfkbbpqjjvvwgxy2v3x8

S/N: 7x9r6-99427-v6dyq-yj493-wpcgf

This is the real Product Key not a fake one at all if it does not work don’t think its a bad one its a good one just call Microsoft and tell them its not working thats means to many people have used this code ok email me if you need help.

Please Note [Update] :

According to Karakacan all the Serial keys have been stopped working, please note that while activating this serials keys won’t work if you connect to microsoft for updates, I recommend you all use the serial Key’s only while installing the windows, after installation use the Activator provided in below Link :

As a suggestion turn off Microsoft Windows Updates to avoid getting caught. The above Activator Works for Windows 7, Windows 8, Windows XP, and Windows Vista

Update: Above link will not work as the files are taken down due to DMCA report by Microsoft.

August 25, 2009 Ritesh Sanap Solutions, Windows Hacks, Windows 7, Windows 8, Windows vista, windows xp

Posts pagination

Previous page Page 1 … Page 28 Page 29 Page 30 … Page 52 Next page

Currently Trending

  • How to download Specific parts of YouTube videos
    How to download Specific parts of YouTube videos
  • Windows Vista CD key
    Windows Vista CD key
  • How to retrieve my Demonoid username
    How to retrieve my Demonoid username
  • How to add Logo to Thesis theme
    How to add Logo to Thesis theme
  • How to Delete Feedbacks from JetPack Contact Form
    How to Delete Feedbacks from JetPack Contact Form
  • List Of All 255 Keyboard All Alt Key Codes
    List Of All 255 Keyboard All Alt Key Codes
  • h4x0r ( Hacker ) - Blogger Template
    h4x0r ( Hacker ) - Blogger Template

Get Latest post in your Inbox

Random Posts

Orkut Update – Now Get Friend Requests only from people of your Choice. – Reduce Strangers in your Friend List

July 29, 2008 By Ritesh Sanap Leave a Comment

6 Tips for Printing From Your Web Browser

October 4, 2011 By James Adams Leave a Comment

Automatic Read More Hack with fixed pages

May 29, 2010 By Ritesh Sanap Leave a Comment

Add Button ‘Save Blogger Post As Pdf’ Blogger

March 18, 2009 By Ritesh Sanap Leave a Comment

Easily Publish your web content around the world

April 21, 2010 By Ritesh Sanap Leave a Comment

WordPress

HTTP2 Server Push for W3 Total Cache Minify plugin

August 17, 2016 By Ritesh Sanap 5 Comments

How to Disable Emojis in WordPress

January 6, 2016 By Ritesh Sanap Leave a Comment

JetPack Related posts and Sharing not working with NGINX

November 10, 2015 By Ritesh Sanap Leave a Comment

Simply Pure – WordPress Theme

November 2, 2014 By Ritesh Sanap 2 Comments

Advanced What should we Write about next? – WordPress Plugin

July 28, 2014 By Ritesh Sanap Leave a Comment

How to Disable Self Pingback or TrackBack

January 16, 2014 By Ritesh Sanap Leave a Comment

BlueStrap – WordPress Theme

January 1, 2014 By Ritesh Sanap 15 Comments

How to Create Multiple Excerpts in WordPress

December 24, 2013 By Ritesh Sanap Leave a Comment

How to Disable Auto Update in WordPress

November 21, 2013 By Ritesh Sanap Leave a Comment

How to Delete Feedbacks from JetPack Contact Form

November 19, 2013 By Ritesh Sanap 9 Comments

Recent Posts

  • HTTP2 Server Push for W3 Total Cache Minify plugin
  • How to show hidden files and folders in Mac OS X
  • How to Disable Emojis in WordPress
  • Canva – Online Photo Editor
  • JetPack Related posts and Sharing not working with NGINX

Archives

Recommends

  • DigitalOcean – Cloud Hosting
  • Dropbox – Cloud Storage
  • Elegant Themes – WordPress Themes
  • LastPass – Password Manager
  • Like us on Facebook
  • Follow on Twitter
  • +1 on Google
  • Subscribe via Email
  • RSS Feed

© 2025 Best 2 Know · All Rights Reserved · We ♥ DigitalOcean